| Needles
If you've purchased an antique or used machine and do not plan on buying a
set of new needles, there are several things to check.
*Check that your needles are all the same type and size.
*Check for any rust that might snag yarn or keep the latches from moving
smoothly.
*Look for any bent needles and either try to bend them back or replace them.
*Bend bent latches back so they move back and forth smoothly.
A good way to check to make sure your needles that are left will run
smoothly in the machine -
Remove your yarn carrier so it won't catch on the latch of the needles. There
is no need to run any yarn through yet.
Add only one needle at a time to the cylinder.
Turn the crank a few times, and if there are no bumps or jerks, add another
needle next to the other and repeat.
This has solved many a problem for me when trying to figure out why the
machine is turning hard backward or forward, or if there is a 'bump' when
turning the crank.
If you decide to buy brand new needles, I sell Auto
Knitter, Legare and Gearhart needles. |
|
THINGS TO LOOK AT IF YOU ARE HAVING TROUBLE WITH DROPPED
STITCHES:
(this is for the auto knitter, but it applies to many of the makes of
machines)
YARN: Use sport weight for the standard 60-needle cylinder, 2/8's
for the 80. Loosen tensions if you are using heavier yarns. Generally
speaking, wool is easier to work than synthetics. The yarn should be strong
and fairly consistent in thickness. Heavily dyed yarns tend to be a bit stiff
and also do not wear as well in sock feet.
NEEDLES: Bent needles will probably drop. Check
them by closing the latch to see if it lines up with the end of the
needle, and by placing them on a flat surface (such as the crescent that comes with the machine) to see if they are
bent. If a needle drops consistently, try replacing it even if it
does not appear to be bent. Rib needle latches, except when they are knitting, may be open or
closed. They do not necessarily close until the stitch slides off as
the new stitch is formed. After a rib needle drops a stitch, the
latch may stay closed, so it will not pick up until you open the
latch again.
ADJUSTMENTS:
TENSION: If the cylinder tension is very loose,
stitches can slide off the needles. For leg warmers or scarves, try
lowering (loosening) the numbered adjusting knob on the cam wing one
full turn. You should not need to change the rib tension. The rib
tension pointer should be between the middle and the inside (toward the dial post) of the adjustment range. The
80/40 set requires slightly tighter tension (toward the outside).
Recheck your timing any time you make a significant change in
tension. Standard tension gives about 1" to each five turns on
the foot of a sock. When measuring the work on the machine, allow a
little for the pull of the weights.
TIMING: The yarn should contact the rib needle about
half way between the hinge of the latch and the point of
the needle as the top of the preceding cylinder needle
comes down level with the top of the cylinder. The timing
adjustment screw should be in the middle range of its
slot; if it is at either end of the machine is definitely
out of time. To adjust it, loosen the timing screw. Move
the tappet plate until the yarn contacts the needle
properly, and then tighten the screw firmly. Timing can
get out of adjustment if the machine jams and is forced.
Go slowly when a knot is being knit in.
Be sure to pull down steadily on the work as you knit; stitches
can slide off or jam up if they work up on the needles. Watch
especially on the left where the fin on the underside of the dial
meets the dial adjuster lever. If your arm gets tired, you're
probably pulling down too hard. Use a lighter touch on the heel hook
when it is being used during the increasing half of heels and toes.
The position of the yarn carrier is important, and can get
shifted or sometimes bent by accident. Check to see that it is close
to both sets of needles, but be sure it is not hitting them. The
crescent should just nicely fit between the rib needles and
the underside of the yarn carrier. If the yarn carrier is hitting
needles you will probably see scratches on it, and needles will get
bent. If you raise or lower the ribber height, remember to also
adjust the yarn carrier. A clean, well-oiled ribber works best. To
clean, remove the ribber from the machine. Loosen the set screw at
the top of the ribber arm and remove the ribber arm, tappet plate
and dial from the dial post. Clean the parts with a rag and/or
brush, especially the dial slots and underside of the tappet plate.
To reassemble, put a few drops of oil on the post, then replace the
dial, tappet plate and ribber arm, holding the parts together well
as you tighten the set screw firmly. Also put oil all around the top
of the dial. I normally use 30 weight zoom spout oil on the machines. When you
replace the ribber on the machine, remember to check the location of
the dial fin. To clean the cylinder, take out the needles; then remove the two
screws on the bottom edge of the cylinder that holds it in place. Lift it out.
Clean with a brush and mineral spirits, following
manufacturer's directions for careful use. While the cylinder is out you can lift off the cam shell and gear. ring and clean them
also. When replacing the gear ring, center the yarn carrier between
the U and the T on the crank wheel. Check p.31
of the AK instruction book to get the upthrow cams in right side up.
Oil where the gear ring and cam shell come together, where the
cylinder needles meet the cam shell, and around the cylinder
cams.
|
| Closing the Toes on Socks,
by KarenInTheWoods - Thank you, Karen! |
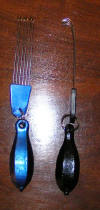
Heel Weight
Or 'Heel Helper'
| These are really great to use when doing a heel. I call
them Heel Helpers. I made them from a pastry blender and added a 1 pound
weight to the bottom of them.
One of the nice things about them is that you can spread the tines as
far out as you would like and they are less apt to tear the fabric. |
 |
 |
|
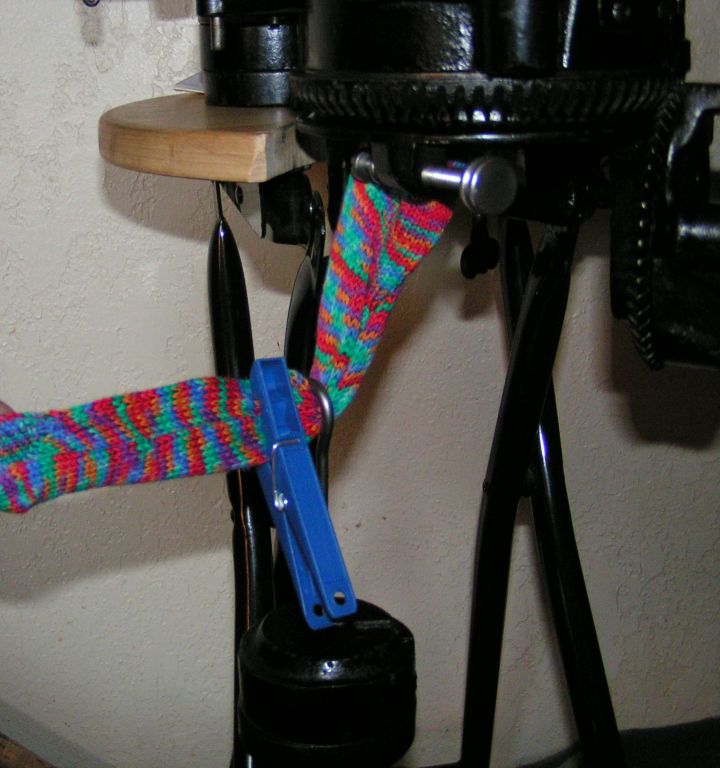
| Don't have a buckle?
There are a lot of other things that can be used instead of
a buckle for holding the weights.
I tend to use some sort of clip instead of a buckle. Just hook the
circle part of your weights around the tubing and clip the hook
underneath. It slides really easily when you need to move your weights
up.
| Click on any of the pictures for a larger view |
 |
 |
 |
 |
 |
|
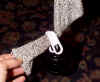
Don't have a set-up basket?
|
Click on any of the pictures for a larger view |
 |
| You can take apart a bath scrunchie and use some of the
netting for starting your knitting by hanging it on the needles. |
|
|
|
|
|